")

The Bubble Test

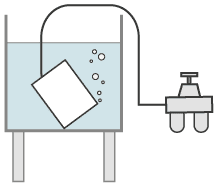
The bubble test seems to be the oldest leak detection method at all. A container is filled with pressurized air and dipped under water. From a leak there will be some bubble emission, an easy method for leak location. To measure the leak rate is not impossible but needs collection of the bubbles, measure their volume and divide this volume by the measuring time. As easy it sounds, the bubble test needs some precautions when it comes to higher filling pressures. A container with gas at high pressure can burst or explode and injuries are possible. So a safety wall between test and operator and inspection via a mirror may be necessary.
Some containers to be tested are too large to be dipped under water. Here an alternative bubble test is used. The critical areas of the container (for example the welds) are moistened with a foam developing liquid. The use of liquids manufactured for just this purpose is recommended. They are delivered in spray cans and they develop a very fine and white bubble mushroom. A large leak may blow away any bubbles and therefore the test may be carried out with first a very low overpressure and only second with the specified pressure.
A variation of the leak test with a foam developing liquid is the leak search on a test object which is not a container and therefore does not have an internal volume (for example the bottom of a large refinery tank) where the welds must be tested for leak tightness. Here the welds are wetted generously with the liquid. Then a small bell jar with a strong window is placed on top of the wet weld. With a small pump the bell jar becomes evacuated. Some rubber gaskets keep the bell jar sealed to the bottom. Inspection of the weld through the window (having proper lighting) will show eventually developing bubbles.
One must be aware that these tests, as all visual leak detection methods, have a weak point. That is the human eye. It is not an exact measurement device and is due to make errors. Even an experienced operator, working with high concentration can miss a bubble.
The sensitivity limit of the bubble test is difficult to determine. Looking at a small area say 10 cm2 with a magnifying glass for the time of a quarter of an hour a bubble developing from a leak of 10-7mbar l/s can be detected. But if an operator has to inspect the welds of 500 tube ends of a heat exchanger, one can expect to see only bubbles coming form a leak of 10-4mbar /ls. Also the sensitivity changes with changing pressures.
On the seminar about tightness measurements and leak testing methods ( see under products) these methods are described in more details.
Leak Test with pressure changing methods
Leak tests with pressure changing methods do show the total leak rate of a test object, also called integral test. They do not show the location of the leak. The pressure changing methods can be divided into three different methods: the pressure decrease test, the pressure increase test and the pressure difference test.
The pressure decrease test
At the pressure decrease test the test object is filled with a gas, in most cases pressurized air, to a pressure higher than atmospheric pressure. If a leak is present, the pressure will decrease over time. From the pressure difference between start and end of the test, multiplied with the volume of the test object and divided by the measuring time the leak rate can be calculated. 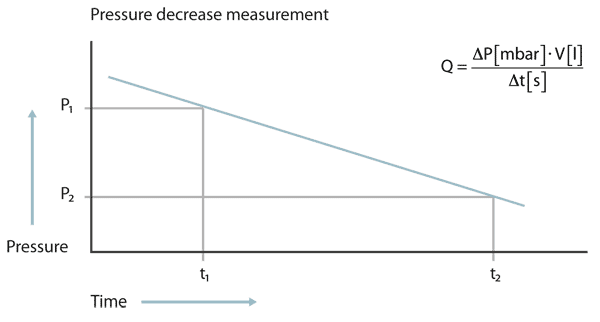
At the pressure decrease test the pressure must be measured with high accuracy and the temperature must be kept constant. Even a change of temperature of a few Centigrade can produce a pressure change larger than that from a leak
When the gas filling pressure is higher more than several bar above atmospheric pressure, a strength test of the container must be performed. This firmness test is done in most cases with water filling. The container is filled with water until no air is remaining. Then the pressure is increased in most cases to factor 1.3 higher pressure than the normal operating pressure of the container. If during this test a crack would happen only some water would be spilled. If the container would have been filled with gas, then the container can explode and make serious damage and injuries or even danger of life to human people.
Such a water pressure test can also work as a rough leak test. A small amount of water coming out of the container will make a distinct pressure change. Also during this test a change of temperature produces a change of pressure because the thermal expansion coefficient of water is larger than that of steel. After such a strength test the container must become completely dry before performing the leak test with gas filling. A small leak can block the gas throughput because water sticks inside the capillary because of its surface tension.
In general it can be said that this leak test procedure is good for small test objects. Objects with large volumes or large geometrical dimensions have easily failures in measurement mostly because of temperature changes It is possible that a large test object does have different temperatures on each end. If someone seriously has to plan such a test, he can contact me for discussion of failure calculations.
The pressure increase test
At the pressure increase test the test object first is evacuated. Then the pressure increase is measured over time. The disadvantage of the pressure decrease test, namely the difficulty to messure very fine pressure changes at a high total pressure is not so present with the pressure increase test, because the amount of gas at begin of the test is much lower and the pressure increase cannot become higher than 1 bar.
Of course at the begin of the test there is a non linear pressure increase coming from the degassing of the inner walls and this is mostly humidity. When the pressure has increased above the water vapour saturation pressure, the pressure change becomes a linar function. This makes it necessary to have a graphic plot of the measurement. Then from the linear part of the curve the leak rate again can be calculated from volume, pressure difference and time.

Pressure difference test
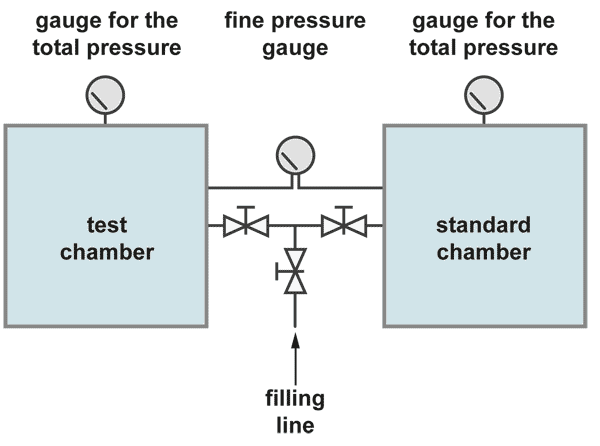
The integral leak test with the pressure difference method is the most accurate test but also some more complicated. The pressure in the test object is compared with the pressure in a standard container which is certainly leak tight. The fine pressure gauge has a pressure range of about 100 mbar full scale, while the total test pressure may be 10 bar.
Both container are filled slowly and simultaneously up to the test pressure. Care has to be taken that the fine leak rate meter is not stressed. After some waiting time for stabilisation of the pressure the pressure difference test can start. So it is possible to have a resolution of the fine pressure gauge of 1 mbar during a total pressure of for example 10 bar. There is also a better chance to overcome the temperature problem. If both containers are similar in dimensions they may change the temperature, if ever, in the same degree and in the same direction.. The leak rate is then calculated in the same manner from volume times pressure difference divided by the measuring time.